Moving Exchange Server 2003 Storage Groups and Databases
When Exchange Server 2003
is first installed, it places the first storage group and databases it
creates in the Mdbdata folder underneath the installation path (for
example, C:\Program files\Exchsrvr\Mdbdata). While this works, it does
not allow for the optimal level of performance and reliability. Exchange
Server 2003 performs best when its transaction logs and database files
are on separate physical disks (or disk arrays). With Exchange Server
5.5 and earlier, there was a utility called Performance Optimizer that
analyzed your server and made recommendations as to where to place the
transaction logs and database files (storage groups did not exist, so
that wasn’t an option). You had the option to accept the
recommendations, to override them by choosing the locations yourself, or
to do nothing at all. Performance Optimizer is not included with
Exchange Server 2003, but you can still move databases.
Exchange System Manager is
used to move both storage groups and databases. To move a storage group,
right-click it and then click Properties. Click the Database tab to
open a dialog box like that shown in Figure 3.
You can click the Browse button next to Transaction Log Location and
select a new folder. You can also change the System Path Location in the
same way. Remember that if you change the location of the transaction
logs, it affects every database in the storage group. As a result, all
databases will be dismounted (taken offline) while the process
completes. Dismounting a database makes it unavailable for users to
access. When you click OK, Exchange System Manager will prompt you with a
message box, warning you of what tasks you are about to perform and
that all databases in the storage group will be temporarily dismounted.
You are prompted to click Yes to continue (which will move the files) or
No to return to the Properties dialog box.
Moving
a database is similar to moving a storage group. Using Exchange System
Manager, right-click the database that you want to move and click
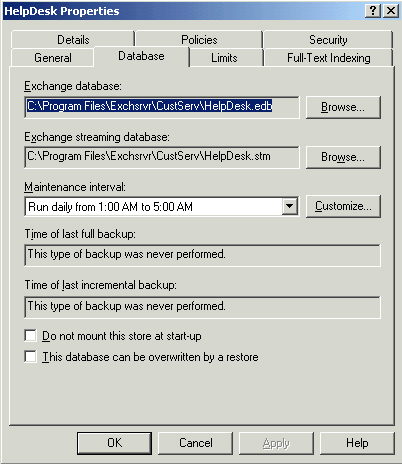
Properties. Next, click the Database tab. For a database, you have the
option of moving the Exchange Database (.edb file) and the Exchange
Streaming Database (.stm file). Generally, there is no advantage in
separating these files, so it makes sense to keep them located in the
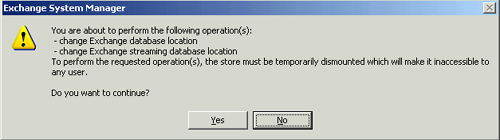
same folder. After choosing new folder locations and clicking OK,
Exchange System Manager will prompt you to confirm, as shown in Figure 4.
When moving a storage group
or database, you can move the log files and database files to any
folder that you want to create. When you move log and database files, it
is recommended that you create the \Exchsrvr\Mdbdata file structure on
the destination disk partition for consistency, but you are not required
to do so.
If you move data to another
partition, you must grant the following default permissions to the new
Mdbdata folder that contains the log files and database files:
Administrators: Full Control
Authenticated Users: Read and Execute, List Folder Contents, Read
Creator Owner: None
Server Operators: Modify, Read and Execute, List Folder Contents, Read, Write
System: Full Control
Moving
log files or database files invalidates all existing incremental and
differential backups, so it is recommended that you perform a full
backup after the move.
Practice: Configuring Information Stores
In this practice, you will
create a new storage group and mailbox stores. You will then move the
storage group to a new location, observing how the change affects the
databases within the storage group and the creation of new databases.
Exercise 1: Create a Storage Group
1. | To
start Exchange System Manager, from the Start menu, point to All
Programs, then point to Microsoft Exchange, and then click Exchange
System Manager.
|
2. | Navigate
to the Exchange Server 2003 server that you will be adding the storage
group to. Right-click the server, point to New, and then click Storage
Group.
|
3. | Type MIS
for the name. Leave all settings at their default for now, but observe
that the paths for the transaction logs are the installation root of
Exchange Server 2003 plus the name of the storage group, such as
C:\Program files\Exchsrvr\Mis. Click OK.
|
4. | The new storage group should have been created on the server.
|
Exercise 2: Add Mailbox Stores
1. | Right-click the MIS storage group, point to New, and then click Mailbox Store.
|
2. | Type HelpDesk for the name. Leave all other settings at their default for now and click OK.
|
3. | Repeat the process and create mailbox stores for SysAdm and Engineering.
|
4. | Observe the new mailbox stores in the MIS storage group.
|
Exercise 3: Move a Storage Group
1. | If
you have a D hard disk partition, create a folder structure for
D:\Exchsrvr\Mis. If you have only a C partition, create a folder
structure such as C:\Exchsrvr\Mis to complete this exercise. This
exercise assumes two physical disk drives configured as C and D.
|
2. | Right-click on the MIS storage group in Exchange System Manager and click Properties.
|
3. | Because
the transaction logs and database files should be on separate physical
disks, you will only need to move one or the other. The databases tend
to consume more disk space than the transaction logs, so change the
System Path Location. To do this, click Browse and select
D:\Exchsrvr\Mis, and then click OK twice. When prompted to continue,
click Yes. All databases in the storage group will be temporarily
dismounted while the process completes.
|
Exercise 4: Move a Database
1. | Right-click
the HelpDesk mailbox store and click Properties. Click the Database
tab. Observe that even though you moved the System Path Location for the
storage group, the databases themselves do not move automatically and
still reflect their original location.
|
2. | Click Browse next to Exchange Database and select D:\Exchsrvr\Mis\Helpdesk for the new path. Click OK.
|
3. | Click
Browse next to Exchange Streaming Database and select
D:\Exchsrvr\Mis\Helpdesk for the new path. Click OK twice, and then
click Yes when prompted to continue. The database will be temporarily
dismounted while the process completes, but no other databases in the
storage group will be affected.
|
4. | Repeat the process and move the SysAdm and Engineering mailbox stores.
|
5. | Right-click the MIS storage group, point to New, and then click Mailbox Store. Type Development
for the name. Click the Database tab. Observe that the default location
of the Exchange Database and Exchange Streaming Database has changed to
reflect the move of the System Path Location for the storage group. |